In this article, we will see how to add RazorPay in WooCommerce website. Razorpay is one of the best payment gateway options for Indian e-Commerce websites.
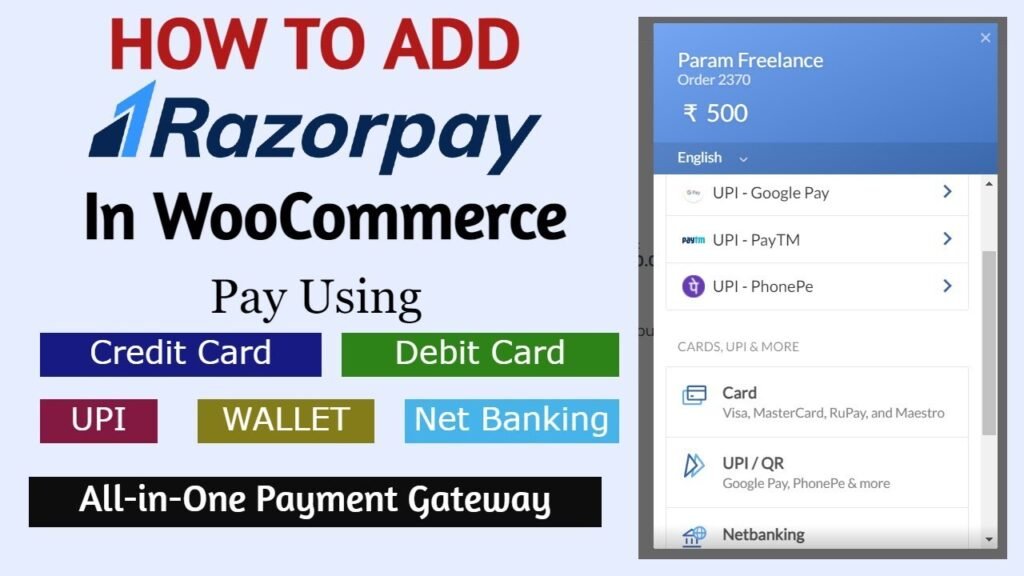
Customers have an all-in-one payment option with Razorpay. Customers will have a variety of payment alternatives when the razorpay payment gateway is integrated into a woocommerce website. Users can pay with Google Pay, Paytm, PhonePe, UPI, Wallet, Credit and Debit Cards, Pay Later, and other wallets.
Online payment solutions are offered by the payment gateway company Razorpay to Indian companies. It enables businesses to process payments using a variety of methods, including wallets, net banking, UPI, debit cards, and credit cards. For both clients and merchants, the organization offers a simple and safe payment process.
You must link your website to your Razorpay account and install a free plugin in order to use the WooCommerce payment gateway with Razorpay.
You need to have account with RazorPay. I have already published a detailed video on how to add RazorPay payment gateway in WooCommerce website. You can watch this video for better understanding.
Watch step by step video tutorial:
I hope this video will help you install RazorPay on your WooCommerce website. I have published many videos on WooCommerce tutorials. You can subscribe to my YouTube channel for latest updates and video tutorials.
Easy steps to add RazorPay in WooCommerce website
- Log in to the WordPress Dashboard and navigate to the “Plugins” section.
- Click on “Add New” and search for the “RazorPay WooCommerce Payment Gateway” plugin.
- Install and activate the plugin.
- Go to the WooCommerce settings page and click on the “Payments” tab.
- Click on RazorPay to open the RazorPay configuration page.
- Enter your RazorPay API Key and Secret Key, which you can obtain from your RazorPay account.
- Enable the payment method by checking the “Enabled” checkbox.
- Configure any additional settings, such as the payment title or order status, as needed.
- Click the “Save changes” button to save your configuration.
That’s it! RazorPay should now be available as a payment option for your customers during checkout.
Benefits of using RazorPay in WooCommerce
The following advantages of using the RazorPay payment gateway:
Multiple Payment Options: RazorPay provides clients with a variety of payment choices, including credit/debit cards, net banking, UPI, and well-known digital wallets.
Seamless Integration: Integrating the payment gateway into websites, mobile applications, or real POS systems is simple for businesses thanks to RazorPay’s range of integration options.
Secure Transactions: RazorPay uses cutting-edge security technologies to protect transactions, including 128-bit SSL encryption and PCI DSS certification.
User-friendly Interface: RazorPay offers an intuitive interface that is simple to use, especially for individuals with little background in technology.
Robust Analytics: RazorPay offers strong analytics that can give businesses insightful information about their payment system, sales patterns, and clientele.
Quick and Efficient: RazorPay offers speedy and effective payment processing, assisting companies in lowering cart abandonment and increasing conversion rates.
Affordable Pricing: RazorPay has no hidden fees and offers inexpensive pricing, making it available to companies of all sizes.
What are RazorPay transaction charges?
The transaction charges for RazorPay vary depending on the type of payment method and the pricing plan chosen by the business. Generally, the transaction charges for online payments using credit/debit cards, net banking, and UPI are as follows:
- Standard Plan: 2% + ₹3 per successful transaction for domestic cards and 3% + ₹3 for international cards.
- Convenience fee: An additional 2% is charged as a convenience fee for customers who choose to pay through net banking or UPI.
Note: These charges are subject to change and it’s recommended to check the RazorPay website or contact their sales team for the latest information on pricing and transaction charges. Additionally, there may be other fees and charges such as chargeback fees, refund fees, and so on, which should be taken into consideration while evaluating the cost of using RazorPay.
You may also like to read the following articles or watch video tutorials:
I hope that this article on How to add RazorPay in WooCommerce will help you. In the upcoming WooCommerce Tutorial article and videos, I will show you how to add different types of products in WooCommerce such as digital products, service products, variable products, Bookings, and accommodations products.
So do not forget to subscribe to our Quick Tips Youtube Channel for upcoming videos on Filmora video editing, Website Design, WordPress Tutorials, Elementor, and WooCommerce tutorials.