Table of Contents
What Is the Elementor Price List Widget?
The Elementor Price List widget is a drag-and-drop tool that lets you build fully styled pricing catalogs and menus directly inside Elementor. Each item in your list can include a title, description, price, image, and a separator line between the name and the price. It is the kind of widget you would use to build a restaurant menu, a salon service list, a spa treatment menu, or a freelancer rate card.
The Price List widget is part of Elementor Pro, which means you need the paid version of the plugin to access it directly. However, if you are on the free plan, do not worry — later in this guide I will show you how to build an almost identical layout manually without any extra plugins.
Who Should Use a Price List Widget?
This widget is ideal for any local business that sells services or physical products at fixed prices. In my experience across 1800+ websites, the businesses that get the most value from a price list widget are:
- Salons and beauty studios listing haircuts, colour treatments, and nail services
- Restaurants and cafes displaying their food and drinks menu with prices
- Gyms and personal trainers showing membership tiers and session rates
- Health clinics and physiotherapy practices listing treatment types and fees
- Coaches and consultants listing their packages and hourly rates
- Photographers displaying their packages for portraits, weddings, and events
If a potential customer needs to know your price before they contact you, you need this widget on your website.
Elementor Pro: How to Add and Set Up the Price List Widget
If you have Elementor Pro installed and activated, follow these steps to add and configure the Price List widget on any page.
Step 1: Open the Page in Elementor
Go to your WordPress dashboard and open the page where you want to add your price list. Click Edit with Elementor to launch the visual editor.
Step 2: Find and Add the Price List Widget
In the Elementor panel on the left, type Price List into the search bar. You will see the Price List widget appear. Drag it and drop it onto the section of your page where you want the pricing to appear.
Once placed, Elementor will populate it with a few sample items automatically so you can see what it looks like right away.
Step 3: Add and Edit Your Price List Items
Click on the widget to open its Content settings in the left panel. You will see a list of items — each one represents a single product or service in your list.
For each item you can set:
- Title: The name of the service or product
- Description: A short line of extra detail (optional but helpful)
- Price: The amount, formatted however you need it
- Image: A photo of the service or dish (great for restaurant menus)
- Link: An optional URL if you want to link the item to another page
- Title HTML Tag: Use this to set the heading level for SEO. H3 is usually the right choice for price list items
To add more items, click the Add Item button at the bottom of the list. To reorder items, simply drag the handle on each item up or down. To duplicate or delete an item, click the duplicate or trash icon on that item.
Step 4: Set the Separator Style
Between the item title and the price, Elementor adds a separator line by default. In the Content settings you can choose the separator style — solid, dotted, dashed, double, or none. I usually go with a dotted separator for menus and a solid line for service lists. It is a small detail but it makes the layout look more intentional and professional.
How to Customise the Price List Widget Style
Once your items are set up, click the Style tab in the left panel to control how everything looks. This is where you make the price list match your brand.
Styling the Items
Under the Items section you can control:
- Background colour for each price list row
- Padding and spacing between items
- Border style and radius around each item
A light alternating background or a subtle border goes a long way in making a long list easy to scan.
Styling the Title and Price
Under the Title and Price sections you can control:
- Font family, size, weight, and colour for both the title and the price
- The price colour is worth calling out — I like to make it slightly bolder and in a brand accent colour so it pops without being aggressive
Styling the Image
If you are adding images to your price list items (great for food menus and product showcases), the Style tab lets you control:
- Image width and height
- Border and border radius (round images can look great for food items)
- Spacing between the image and the text content
- Vertical alignment of the image relative to the item content
Mobile Responsiveness
The Price List widget is mobile friendly out of the box, so your pricing will look good on phones and tablets without extra work. That said, I always recommend previewing your page on mobile inside the Elementor editor before publishing — just click the mobile icon at the bottom of the left panel to switch views.
How to Build a Price List Without Elementor Pro (Free Method)
Not on Elementor Pro? No problem. You can build a very similar price list manually using just the free Elementor plugin. It takes a little more setup, but you actually get more layout flexibility once you know what you are doing.
Step 1: Create a Single Price List Row
Start by adding a new section to your page. Inside it, create a two-column layout — one column on the left for the service name and description, and one column on the right for the price.
Add a Heading widget to the left column for the service name, a Text widget below it for the description, and another Heading or Text widget in the right column for the price.
Step 2: Style the Row
Set a background colour on the section, add some padding so the content is not cramped, and adjust the font sizes and colours to match your brand. You can also add a bottom border to the section to act as a separator between rows.
Step 3: Duplicate the Row for Each Item
Right-click on the section you just built and select Duplicate. Then just edit the text in each duplicated row to reflect your next service or product.
This is the key efficiency trick with the manual method — you only design one row carefully, then clone it as many times as you need. You can also manually change the background colour of individual rows to create contrast or highlight featured items, which you actually cannot do as easily inside the native Price List widget.
Step 4: Group Everything in a Container
Once all your rows are created, select all the sections by holding Shift and clicking each one, then right-click and wrap them in a container or group. This makes the whole price list easy to move, duplicate, or copy to other pages.
Tips to Make Your Price List Convert Better
A price list is not just a reference — it is a sales tool. Here are the things I do on every client website to make sure the pricing section actually moves people toward booking or buying:
- Keep descriptions short. One or two lines is enough. You are not writing a product manual — just enough to reassure the visitor they are looking at the right service.
- Highlight your most popular or recommended service. You can do this by giving that item a different background colour or adding a small badge label next to the name.
- Add a call to action below the list. After someone reads your prices, the next step should be obvious. A Book Now button or a Contact Us link directly below the price list removes the friction of having to hunt for how to get in touch.
- Include images where they make sense. For restaurants and salons especially, an image next to each item dramatically increases the time visitors spend on the page and the likelihood they will pick something.
- Do not list too many items. If you have more than 15 to 20 items, consider grouping them under categories or using the Tabs widget to split them into sections. A wall of prices overwhelms people.
- Make sure prices are always up to date. A wrong price on a website destroys trust fast. If your prices change frequently, consider adding a small note like Starting from or Prices as of [month/year] so visitors know the list is current.
Price List Widget vs Pricing Table Widget: What Is the Difference?
This is a question I get from clients a lot. Both are Elementor Pro widgets and both display pricing — but they serve different purposes.
The Price List widget is designed for itemised menus and service lists where each item has its own name, description, and individual price. Think restaurant menus, salon service lists, or product catalogs.
The Pricing Table widget is designed for plan-based pricing where you want to compare two or three tiers side by side — like Basic, Standard, and Premium plans. It includes a features list, a call-to-action button, and even a ribbon or badge to highlight the most popular plan.
In short: if you are selling services item by item, use the Price List widget. If you are selling packages or subscription tiers, use the Pricing Table widget. I have a separate detailed tutorial on the Pricing Table widget on this site if you need that one instead.
Frequently Asked Questions
Is the Elementor Price List widget free?
The Price List widget is part of Elementor Pro, which is the paid version of the plugin. If you are using the free Elementor plugin, you will not see the Price List widget in your panel. However, you can build a very similar layout manually using free Elementor widgets — the guide above explains exactly how to do this.
Can I add images to the Elementor price list?
Yes. Each item in the Price List widget has an optional image field. When you click on an item in the Content settings, you will see an option to upload or select an image. This is especially useful for restaurant menus and product showcases where a visual helps the customer decide.
How do I add a separator between the item name and price in Elementor?
The Price List widget includes a separator option inside the Content settings. You can choose the separator style — solid, dotted, dashed, double, or none — and the Style tab lets you control the separator colour and thickness.
Can I link individual price list items to another page?
Yes. Each price list item has a Link field in its Content settings where you can paste a URL. This is useful if each service has its own dedicated page with more details, or if you want to link directly to a booking form.
What is the difference between the Price List and Pricing Table widgets in Elementor?
The Price List widget is best for showing individual items with separate prices, like a menu or a service list. The Pricing Table widget is designed for comparing subscription or package tiers side by side, with a features list and call-to-action buttons. Use the Price List for item-by-item pricing and the Pricing Table for plan-based pricing.
Is the Elementor Price List widget mobile friendly?
Yes, the Price List widget is designed to be responsive and will display correctly on mobile phones and tablets without extra configuration. It is always a good idea to preview your page on mobile inside the Elementor editor before publishing, just to confirm everything looks right on smaller screens.
How do I highlight a featured or popular item in the Elementor price list?
The native Price List widget does not have a built-in featured badge option like the Pricing Table widget does. The easiest way to highlight a specific item is to manually change the background colour of that row in the Style settings, or add a small text label like Most Popular next to the item title in the description field.
Final Thoughts
Thanks for reading all the way through — I really hope this tutorial makes setting up your price list a lot less stressful. Whether you are using Elementor Pro or building it manually with the free plugin, you now have everything you need to get a clean, professional pricing section live on your site. I have also recorded a detailed step-by-step video tutorial that walks through the whole process visually — head over to my Quick Tips YouTube channel to watch it, and make sure you subscribe so you do not miss future tutorials. If you run into any issues or have a specific question about your setup, drop it in the comments below — I read every single one and I am happy to help. And if you would rather have someone handle it for you, feel free to get in touch with me directly at paramfreelance.com. Building clean, fast websites for local businesses is exactly what I do every day.
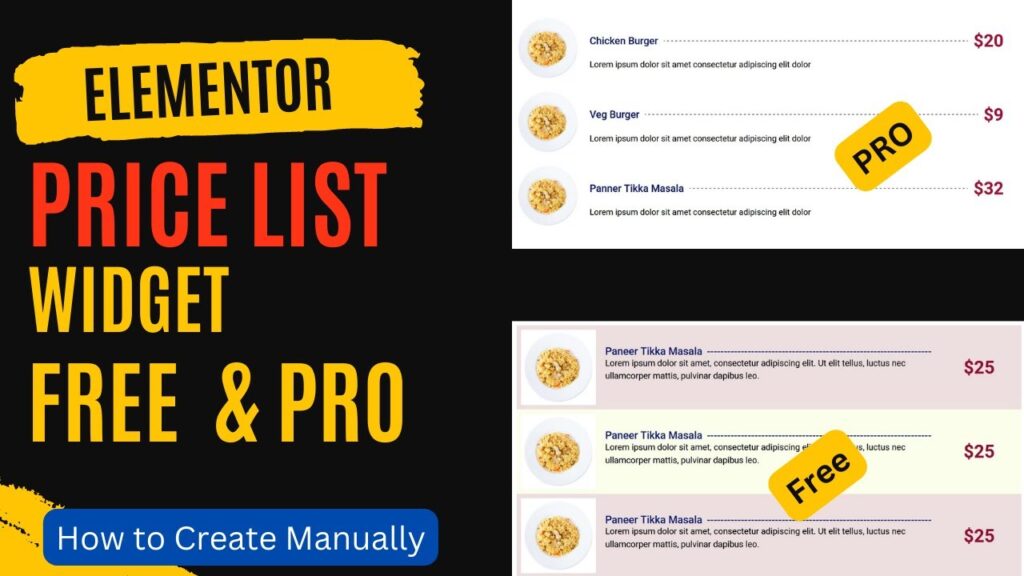
I hope that this article on How to use Elementor Price List Widget will help you. Read more articles on Elementor Tutorials.
Do not forget to subscribe to our Quick Tips Youtube Channel for upcoming videos on Website Design, WordPress Tutorials, Elementor, and WooCommerce tutorials.