Too much content crammed onto a single page is one of the fastest ways to lose a visitor. People scan — they don’t read — and if they can’t find what they’re looking for in seconds, they’re gone. That’s exactly why the Elementor Tabs Widget is one of my favourite tools when building websites for local businesses. Whether you’re a salon listing your services, a clinic showing treatment options, or a coach explaining your packages, tabs let you organise all that information into neat, clickable sections without making the page feel overwhelming. The best part? You do not need Elementor Pro to use the Tabs Widget — it is included in the free version of Elementor. In this tutorial, I’ll walk you through exactly how to add the Tabs Widget to your page, customise it, style it to match your brand, and even supercharge it with a free plugin that unlocks advanced features like image tabs and post tabs.
Table of Contents
What Is the Elementor Tabs Widget?
The Elementor Tabs Widget is a built-in content widget that lets you organise your page content into separate clickable tab panels. Instead of stacking all your information vertically — which makes pages long and tiring to scroll through — tabs let visitors switch between different sections of content with a single click, all in the same spot on the page. This widget is part of the free Elementor plugin, so there is no need to upgrade to Elementor Pro just to use basic tabs. You can add titles, descriptions, icons, and even nest other Elementor widgets inside each tab panel. Think of it like a filing cabinet. Each tab is a labelled folder. Your visitor picks the folder they care about and reads only what’s relevant to them — without scrolling past everything else.
Why Use Tabs on a Local Business Website?
In my experience building sites for salons, gyms, coaches, and clinics, tabs solve one very specific problem: too much information, not enough patience from the visitor. Here are the main reasons I recommend the Tabs Widget to almost every client with a services or about page: – Content organisation: Tabs group related information so visitors can jump directly to what matters to them — for example, separating a restaurant’s Lunch Menu, Dinner Menu, and Drinks menu into three tabs. – Space saving: Instead of a long scrolling page, you present multiple chunks of content in one compact area, keeping the page clean and fast. – Better user experience: Visitors feel in control when they can navigate content themselves. A professional tabbed layout also builds trust. – Improved readability: Breaking content into labelled tabs makes it far less intimidating than one long block of text. – No extra cost: Because the Tabs Widget is free in Elementor, you get all these benefits without paying for Pro.
How to Add the Elementor Tabs Widget to Your Page
Adding the Tabs Widget is straightforward. Here’s exactly how to do it: – Open the page you want to edit in WordPress and click “Edit with Elementor” to launch the Elementor editor. – In the left-side widget panel, type “Tabs” into the search bar. – When the Tabs widget appears in the results, click and drag it onto the section of your page where you want it to appear. – The widget will drop onto the canvas with default tab items already in place so you can immediately start customising. That’s all there is to placing the widget. From here, the real work is editing the tab content and styling it to match your site.
How to Add and Edit Tab Content
Once the Tabs Widget is on your canvas, click on it to open its settings in the left panel. You’ll land on the Content tab by default. Under the Tabs section, you’ll see Tab Items. Each item represents one tab panel. By default, the widget comes with two or three starter tabs. Here’s how to work with them: – Click on any tab item to expand it and edit its Title and Content fields. – The Title is the label that appears on the clickable tab button at the top. – The Content field is the text or description that appears inside the tab panel when that tab is active. – To add a new tab, click the “Add Item” button at the bottom of the tab list. – To delete a tab you don’t need, open that tab item and click the trash/delete icon. – You can reorder tabs by dragging the handle on each item up or down. For more advanced layouts inside a tab panel — for example, placing an image next to a paragraph, or adding a button — you can drop other Elementor widgets directly into the tab’s content container. This is especially useful if you want rich content inside each tab rather than just plain text.
How to Style the Tabs Widget (Colors, Typography, Layout)
After setting up your content, click the Style tab in the left panel to access all the visual customisation options. This is where you match the tabs to your site’s branding. Here’s a breakdown of what you can control: – Tab title color: Set separate colors for the default, hover, and active (currently selected) states of each tab button label. This gives a clear visual cue to visitors about which tab they are on. – Typography: Adjust the font family, size, weight, and line height for both the tab titles and the tab content descriptions independently. – Background color: Set a background color for the tab panel content area — useful for making the content area stand out from the rest of the page. – Border and border radius: Add a border around your tabs or round the corners for a softer look. – Box shadow: Add a subtle shadow around the tab panel to give it a lifted, card-like appearance. – Padding and spacing: Control the spacing inside and between tab elements for a clean, breathable layout. A practical tip from my workflow: for most local business sites I keep the styling minimal — one brand color for the active tab, neutral grey for inactive tabs, and clean sans-serif typography. You don’t need fancy effects; clarity always wins.
How to Set Tab Direction: Horizontal vs. Vertical
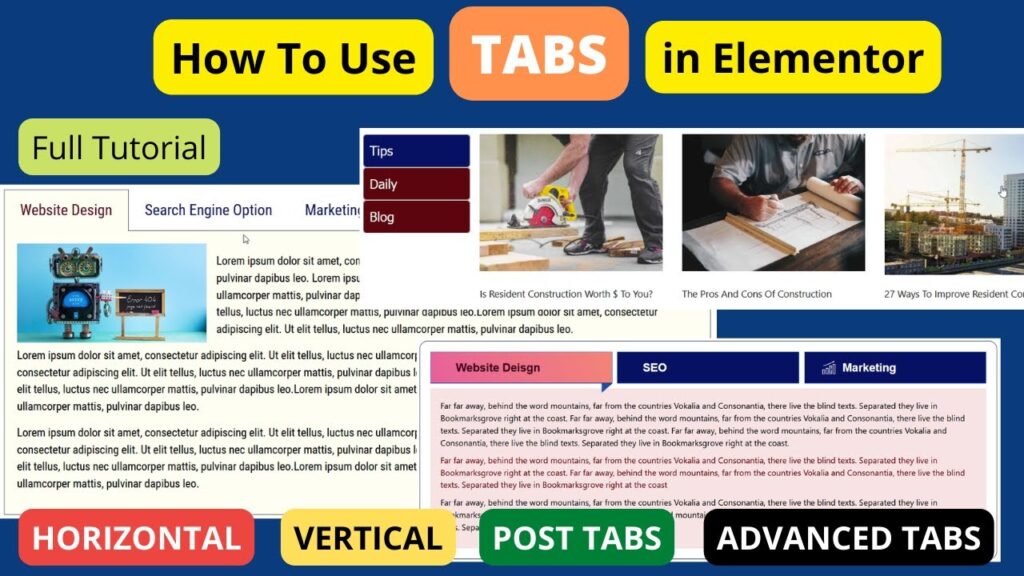
One setting clients often miss is the tab direction option. By default, Elementor displays tabs horizontally — the tab labels sit in a row across the top and the content appears below. But you can switch this to a vertical layout where the tab labels run down the left side and the content appears to the right. To change this, go to the Content tab in the widget settings and look for the Type or Layout option. Select either Horizontal or Vertical. When to use each: – Horizontal tabs work best when you have three to five short tab labels and the content below each tab is roughly the same height. This is the most common layout for service pages and menu pages. – Vertical tabs work well when you have longer tab labels (full sentences or category names) or when you have many tabs. They also look great on wider desktop layouts where you have horizontal space to spare. For most of the small business sites I build, horizontal tabs are the go-to. They feel familiar to visitors and work cleanly on both desktop and mobile.
How to Add Icons or Images to Your Tabs
The Elementor Tabs Widget supports icons on tab labels — a small but effective detail that makes your tabs more scannable and visually appealing. To add an icon to a tab: – Click on a tab item in the Content settings. – Look for the Icon option within that item’s settings. – Click the icon field and choose from Elementor’s built-in icon library (Font Awesome icons), or upload your own SVG file. – You can also set a separate Active Icon — this is the icon that appears when that particular tab is selected, letting you show a different visual state for the active tab. For image-based tabs (where you want a thumbnail photo inside the tab button instead of just an icon or text), the free Elementor Tabs Widget has limited support. This is where a free addon plugin becomes very useful — more on that in the next section. A quick styling note: if you add icons, make sure the icon size is consistent across all tabs and that the icon color matches or complements your active tab color. Inconsistency here looks unprofessional.
Supercharge Your Tabs with a Free Plugin
The built-in Elementor Tabs Widget is solid for most use cases, but if you need more advanced features — image tabs, post tabs, carousel tabs, or accordion fallback on mobile — a free addon plugin unlocks all of this without paying for Elementor Pro. There are a few good free options in the WordPress plugin directory. The one I often recommend to clients is installing an Elementor addon plugin that adds an advanced tabs widget to the editor. Once installed and activated, you’ll find the advanced tabs widget appear in your Elementor panel alongside all the other widgets. Here’s what the advanced/free plugin version typically unlocks that the default widget doesn’t offer: – Image tabs: Place a custom photo inside the tab button itself, not just text or an icon. Great for portfolio sites or product category pages. – Post tabs: Automatically pull in your blog posts and organise them by category inside the tabs. The plugin fetches the categories automatically and displays posts under each one — perfect for content-heavy sites or news sections. – Carousel tabs: Display tabs in a horizontal carousel on mobile so users can swipe between tab labels instead of stacking them. – Accordion on mobile: Automatically switch the tab layout to an accordion style on small screens, which is far more mobile-friendly than horizontal tab buttons that wrap awkwardly. Setting up the plugin is simple: go to your WordPress dashboard, click Plugins > Add New, search for your chosen Elementor addon, install it, and activate it. The new advanced tabs widget will then appear inside the Elementor editor automatically.
Tips for Using Elementor Tabs on Mobile
Mobile responsiveness is something I check on every single site I hand over to a client. Tabs that look great on desktop can sometimes look messy on a phone screen — especially if you have many tabs with long labels. Here are my practical tips for keeping your Elementor tabs mobile-friendly: – Limit tab labels to 1-3 words on each tab wherever possible. Short labels don’t wrap to a second line on small screens. – Use the accordion fallback option if you’re using an addon plugin. This automatically converts your tabs into an accordion (expandable/collapsible sections) on mobile, which is much more touch-friendly. – Preview your tabs in Elementor’s responsive preview mode (the tablet and phone icons at the bottom of the editor) before publishing. What looks fine on desktop can break on mobile. – If you have more than five tabs, consider splitting the content across two sections rather than cramming it all into one tab widget. A long row of tab buttons on mobile becomes hard to tap accurately. – Keep the content inside each tab reasonably short. If one tab contains thousands of words, consider whether it should be its own page instead.
Common Mistakes to Avoid with the Tabs Widget
After building 1800+ websites, I’ve seen the same tab-related mistakes come up again and again. Here’s what to watch out for: – Too many tabs: More than six or seven tabs becomes confusing and defeats the purpose of organised navigation. If you have that many sections, consider using a menu or separate pages instead. – Vague tab labels: Labels like ‘Info’ or ‘Details’ tell the visitor nothing. Be specific: ‘Pricing’, ‘Services’, ‘Our Team’, ‘Book Appointment’. – Inconsistent content depth: If one tab has two sentences and another has five paragraphs, the layout feels unbalanced. Aim for roughly similar content volume across tabs. – Skipping the active tab color: If the active tab doesn’t look visually different from the inactive ones, visitors won’t know which tab they’re on. Always set a distinct active state color. – Ignoring load time: Adding videos or large images inside every tab can slow the page down. Compress images before placing them inside tab panels, and use YouTube embeds rather than self-hosted video.
Frequently Asked Questions
Do I need Elementor Pro to use the Tabs Widget?
No, the Elementor Tabs Widget is included in the free version of the Elementor plugin. You do not need Elementor Pro to add and use basic tabs on your WordPress website. Pro is only required for more advanced widgets like the Pricing Table or Theme Builder features.
How do I add a new tab in the Elementor Tabs Widget?
Click on the Tabs Widget in the Elementor editor to open its settings in the left panel. Under the Content tab, find the Tab Items section and click the ‘Add Item’ button at the bottom. A new blank tab will appear, which you can then rename and fill with content.
Can I add images inside Elementor tabs?
Yes, you can add images inside the tab content panel by dragging an Image widget into the tab’s container. For images inside the tab label/button itself, you’ll need a free addon plugin that supports image tabs, as this feature is not available in the default Elementor Tabs Widget.
Is the Elementor Tabs Widget mobile responsive?
Yes, the Tabs Widget adapts to different screen sizes. However, on very small screens with many tabs, the tab buttons can look cluttered. Using a free addon plugin that supports accordion fallback on mobile will give you a much cleaner experience on phones.
Can I display blog posts inside Elementor tabs?
Not with the default Tabs Widget. To create post tabs that automatically pull in blog posts by category, you’ll need to install a free Elementor addon plugin that supports post tabs functionality. Once set up, the plugin fetches your post categories and displays blog entries under each tab automatically.
How do I change tabs from horizontal to vertical in Elementor?
Click on the Tabs Widget to open its settings, go to the Content tab, and look for the Type or Layout option. Change the setting from Horizontal to Vertical and the tab labels will shift from a top row to a left-side column layout.
Does adding the Elementor Tabs Widget slow down my website?
The Tabs Widget itself is a lightweight element and generally has minimal impact on page load times. However, if you place heavy images or embedded videos inside multiple tab panels, that content can add to load time. Always compress images and use YouTube embeds rather than self-hosted video to keep things fast.
Final Thoughts
And that’s a wrap on the Elementor Tabs Widget! It’s one of those simple tools that makes a genuine difference to how visitors experience your site — especially for local businesses with a lot of services, menu items, or FAQs to show. The fact that it’s completely free is just the cherry on top. If you’re more of a visual learner, I’ve put together a detailed step-by-step video tutorial that walks through everything covered in this article — adding the widget, editing the content, styling it, and setting up the free plugin for advanced features. Go ahead and watch it on my YouTube channel and make sure you subscribe so you don’t miss future tutorials. Have a question about setting this up on your specific site? Drop it in the comments below — I read every single one and I’m happy to help. And if you’d rather have someone set it up for you properly, feel free to reach out to me directly at paramfreelance.com. I build clean, fast websites for local businesses every day, and I’d love to help you get yours looking great.
I hope that this article on How to use Elementor Tabs Widget will help you. Read more articles on Elementor Tutorials.
Do not forget to subscribe to our Quick Tips Youtube Channel for upcoming videos on Website Design, WordPress Tutorials, Elementor, and WooCommerce tutorials.