If you run a WooCommerce store and want to collect extra information from customers — like a custom engraving message, a file upload for a print-on-demand product, or a color preference — you need a WooCommerce product custom fields plugin. The problem? Most premium plugins charge monthly fees, and hiring a developer to build a custom solution costs hundreds of dollars. In this guide, you will learn how to build your own fully functional, free WooCommerce product custom fields plugin from scratch using Claude AI — no deep coding knowledge required.
Copy the prompt below to create same WooCommerce product custom fields plugin using claude ai
Build a complete, installable WooCommerce Product Custom Fields WordPress plugin.PLUGIN DETAILS:
- Plugin Name: WooCommerce Product Custom Fields
- Author: Quick Tips
- Version: 1.3.0
- Text Domain: woo-custom-fields
- Requires WordPress 6.0+, WooCommerce 7.0+, PHP 7.4+════════════════════════════════════════
FILE STRUCTURE
════════════════════════════════════════
woo-custom-fields/
├── woo-custom-fields.php
├── admin/
│   ├── class-wcf-admin.php
│   ├── css/admin.css
│   └── js/admin.js
├── includes/
│   ├── class-wcf-post-meta.php
│   ├── class-wcf-frontend.php
│   └── class-wcf-order.php
└── frontend/
├── css/frontend.css
└── js/frontend.js════════════════════════════════════════
FIELD TYPES (6 total)
════════════════════════════════════════
1. Text           — single-line input
2. Textarea       — multi-line resizable input
3. File Upload    — file input with type + size restrictions
4. Color Picker   — native color input with live hex value display
5. Checkbox       — multi-select, options list, per-option pricing
6. Radio Buttons  — single-select, options list, per-option pricing════════════════════════════════════════
STABLE FIELD ID GENERATION (CRITICAL)
════════════════════════════════════════
This is the most important technical requirement. Failure here breaks all validation.IN JAVASCRIPT (admin.js):
When "+ Add Field" is clicked, immediately assign a unique ID to the hidden [id] input:
var newId = 'wcf_' + Date.now().toString(36) + Math.random().toString(36).slice(2, 8);
$row.find('input[name$="[id]"]').val(newId);When "+ Add Option" is clicked for checkbox/radio, immediately assign a unique ID:
var optId = 'wcfo_' + Date.now().toString(36) + Math.random().toString(36).slice(2, 8);
$opt.find('input[name$="[id]"]').val(optId);IN PHP (class-wcf-post-meta.php save_fields()):
NEVER use: sanitize_key($f['id'] ?? uniqid('wcf_'))
— this treats empty string '' as a valid value and never generates a real ID.ALWAYS use:
$incoming_id = isset($f['id']) ? sanitize_key($f['id']) : '';
$field_id = ($incoming_id !== '') ? $incoming_id : uniqid('wcf_');Same pattern for option IDs inside checkbox/radio options arrays:
$incoming_oid = isset($opt['id']) ? sanitize_key($opt['id']) : '';
$opt_id = ($incoming_oid !== '') ? $incoming_oid : uniqid('wcfo_');════════════════════════════════════════
ADMIN PANEL (Product Editor)
════════════════════════════════════════
Add a "Custom Fields" tab inside the WooCommerce Product Data meta box (priority 85).Each field row shows a collapsible card with:
- Header: drag handle (dashicons-menu), field label, TYPE badge, REQUIRED badge
(red, hidden by default, shows when required toggle is ON), toggle collapse button,
Remove button
- Body contains:
□ Field Type selector (Text / Textarea / File Upload / Color Picker /
Checkbox multi-select / Radio Buttons single-select)
□ Label input
□ Placeholder input (hide for Checkbox and Radio)
□ Required toggle — styled ON/OFF switch (not a plain checkbox)
- Uses CSS toggle switch with sliding handle
- Live updates the REQUIRED badge in the header on change
□ Extra Price input (currency symbol + number input)
- HIDE for: Color Picker, Checkbox, Radio (these use per-option pricing)
- SHOW for: Text, Textarea, File Upload
- Label: "Extra Price — Added to product price only if customer uses this field"
□ Display Position (Before / After Add to Cart button)
□ File Upload options block (shown only when type = File Upload):
- Allowed file types (comma-separated, default: jpg,jpeg,png,pdf,doc,docx)
- Max file size in MB (number input, default: 5)
□ Options Editor block (shown only when type = Checkbox or Radio):
- Label: "Options (each option can have its own extra price)"
- List of option rows, each with:
· Hidden id input
· Option label text input
· Currency symbol + extra price number input
· × Remove button
- "+ Add Option" button
- Auto-show options editor when switching type to Checkbox or Radio
- Auto-add one blank option row if switching to Checkbox/Radio with no options yetHidden JS templates (rendered PHP, placed in <script type="text/html">):
- #wcf-field-template using placeholder __INDEX__ for the field index
- #wcf-option-template using placeholders __FIELD_NAME__ and __OPT_INDEX__

Drag-to-reorder fields using jQuery UI Sortable (handle: .wcf-sort-handle).
reindex() function updates wcf_fields[N] indices on drag drop.
reindexOptions() function updates [options][N] indices on option removal.

════════════════════════════════════════
DATA STORAGE (class-wcf-post-meta.php)
════════════════════════════════════════
Meta key: _wcf_custom_fields
Store as array of field definitions. Each field:
  id, type, label, placeholder, required (bool), position (before/after),
  allowed_types, max_size_mb, extra_price (0.0 for color/checkbox/radio),
  options (array of {id, label, extra_price} — only used by checkbox/radio)

sanitize_options() helper:
  - Loop options array, skip any with empty label
  - Apply same stable ID logic as fields
  - Return clean array

repair_field_ids($product_id):
  - Load saved fields, find any with empty or duplicate IDs
  - Assign new uniqid() to broken ones
  - Also repair option IDs inside checkbox/radio fields
  - Save back only if changes were made

repair_all():
  - Query all post_ids from postmeta WHERE meta_key = '_wcf_custom_fields'
  - Run repair_field_ids() on each

════════════════════════════════════════
UPGRADE / ACTIVATION ROUTINE
════════════════════════════════════════
Define constant WCF_VERSION_OPT = 'wcf_installed_version'.

wcf_setup_upload_dir():
  - Create wp-content/uploads/woo-custom-fields-uploads/ if not exists
  - ALWAYS rewrite .htaccess (not just on first install) with EXACTLY this content:
      Options -Indexes
      <FilesMatch "\.(php|php3|php4|php5|phtml|pl|py|cgi|asp|aspx|sh)$">
        Require all denied
      </FilesMatch>
  - This MUST use "Require all denied" inside FilesMatch — NOT "deny from all"
  - "deny from all" causes 403 Forbidden errors when admins click "View file" links
  - Create index.php with <?php // silence if not exists

wcf_activate() (register_activation_hook):
  - Call wcf_setup_upload_dir()
  - delete_option(WCF_VERSION_OPT) to force repair on next load

wcf_maybe_upgrade() (called inside wcf_init after classes loaded):
  - Compare get_option(WCF_VERSION_OPT) to WCF_VERSION
  - If different: run WCF_Post_Meta::repair_all(), wcf_setup_upload_dir(),
    update_option(WCF_VERSION_OPT, WCF_VERSION)

════════════════════════════════════════
FRONTEND RENDERING (class-wcf-frontend.php)
════════════════════════════════════════
Hooks:
- woocommerce_before_add_to_cart_button → render fields with position = 'before'
- woocommerce_after_add_to_cart_button  → render fields with position = 'after'

Each field renders inside:
  <div class="wcf-field wcf-type-{type}"
       data-field-id="{id}"
       data-extra-price="{field_extra_price}"
       data-field-required="{1 or 0}">

Label: field label + red * span if required + green price badge if field has extra price
  (price badge only for Text, Textarea, File Upload — NOT for Color, Checkbox, Radio)

Text:     <input type="text" name="wcf_fields[{id}]" ...>
Textarea: <textarea name="wcf_fields[{id}]" rows="4" ...></textarea>
File:     <input type="file" name="{id}_file" accept="..." data-max-mb="...">
          + hint text below: "Allowed: jpg,png,pdf — Max: 5MB"
Color:    <input type="color" name="wcf_fields[{id}]" value="#ffffff">
          + <span class="wcf-color-value">#ffffff</span> beside it

Checkbox: <div class="wcf-choice-wrapper">
  For each option:
    <label class="wcf-choice-option">
      <input type="checkbox"
             name="wcf_fields[{field_id}][]"
             value="{option_id}"
             data-extra-price="{opt_price}">
      Option Label
      <span class="wcf-extra-price-badge">+price</span> (if opt_price > 0)
    </label>
  </div>

Radio:    <div class="wcf-choice-wrapper">
  For each option:
    <label class="wcf-choice-option">
      <input type="radio"
             name="wcf_fields[{field_id}]"
             value="{option_id}"
             data-extra-price="{opt_price}"
             required (if field is required)>
      Option Label
      <span class="wcf-extra-price-badge">+price</span> (if opt_price > 0)
    </label>
  </div>

════════════════════════════════════════
SERVER-SIDE VALIDATION
════════════════════════════════════════
Hook: woocommerce_add_to_cart_validation

For each required field:
- Text / Textarea / Color:
    $val = trim(sanitize_text_field($_POST['wcf_fields'][$field['id']] ?? ''));
    if ($val === '') → wc_add_notice('"Label" is required.', 'error')

- File Upload:
    if (empty($_FILES[$field['id'] . '_file']['name'])) → error notice

- Checkbox:
    $selected = is_array($_POST['wcf_fields'][$field['id']] ?? null)
                ? $_POST['wcf_fields'][$field['id']] : [];
    if (empty($selected)) → "Please select at least one option for Label."

- Radio:
    $val = sanitize_key($_POST['wcf_fields'][$field['id']] ?? '');
    if ($val === '') → "Please select an option for Label."

════════════════════════════════════════
CART DATA & PRICING (class-wcf-frontend.php)
════════════════════════════════════════
Hook: woocommerce_add_cart_item_data
Collect submitted values, resolve option labels, calculate extra price:

- Text/Textarea/Color: if non-empty, store {label, value, type, extra_price}
  total_extra += field extra_price
- File Upload: handle upload, store URL, total_extra += field extra_price
- Checkbox: get array of selected option IDs, resolve to labels, sum option prices
  store as comma-separated label string, total_extra += sum of selected option prices
- Radio: get selected option ID, resolve to label, get that option's price
  total_extra += that option's extra_price

Store in cart_item_data:
  'wcf_custom_fields' => $values (array of {label, value, type, extra_price})
  'wcf_extra_total'   => $total_extra
  'wcf_unique_key'    => md5(serialize($values))

Hook: woocommerce_before_calculate_totals
  foreach cart items: if wcf_extra_total > 0
    $product->set_price($product->get_price() + $cart_item['wcf_extra_total'])
  Guard: if (is_admin() && !defined('DOING_AJAX')) return;

FILE UPLOAD HANDLING:
- Check file size against max_size_mb
- Check extension against allowed_types list
- Use wp_unique_filename() + sanitize_file_name()
- move_uploaded_file() to the secure uploads directory
- Return the public URL

════════════════════════════════════════
CART / CHECKOUT / EMAIL DISPLAY
════════════════════════════════════════
Hook: woocommerce_get_item_data
For each entry in wcf_custom_fields:
- If type = 'file': display as <a href="url">View file</a>
- Otherwise: esc_html($entry['value'])
- If extra_price > 0: append (+ wc_price(extra_price)) in green

════════════════════════════════════════
ORDER INTEGRATION (class-wcf-order.php)
════════════════════════════════════════
Hook: woocommerce_checkout_create_order_line_item
Save each field as order item meta:
  key = 'wcf_field_{id}', value = {label, value, type, extra_price}

Hook: woocommerce_after_order_itemmeta (admin order page)
Show a "Custom Fields" section below each line item:
- Text/Textarea/Radio/Checkbox: display the value
- Color: display hex + a small colored square swatch
- File: display as clickable link "View uploaded file"
- If extra_price > 0: show "(+ wc_price)" in blue beside the value

Hook: woocommerce_order_item_get_formatted_meta_data
Format for emails and My Account order view:
- Build display_key = field label, display_value = value (file as link)
- Append extra price if > 0

════════════════════════════════════════
FRONTEND CSS (frontend/css/frontend.css)
════════════════════════════════════════
- .wcf-custom-fields: margin 16px 0
- .wcf-field: margin-bottom 16px
- .wcf-field label: block, font-weight 600, 14px
- .wcf-required: red color for the * asterisk
- Text/Textarea inputs: full width, 8px 12px padding, 1px solid #ccc border,
  border-radius 4px, focus highlight with WooCommerce purple (#96588a)
- .wcf-extra-price-badge: green badge (#eafaf1 bg, #1d7a4c text)
- .wcf-extra-price-summary: green bold text, shows running extra total
- .wcf-color-wrapper: flex row, gap 12px
- color input: 48x48px box
- .wcf-color-value: monospace, gray pill display
- .wcf-choice-wrapper: flex column, gap 8px
- .wcf-choice-option: flex row, align-items center, gap 8px, font-weight 400
- checkbox/radio inputs inside choice-option: 16x16px, no extra margin
- .wcf-field.wcf-error input/textarea: red border
- .wcf-field.wcf-error .wcf-choice-wrapper: red outline

════════════════════════════════════════
FRONTEND JS (frontend/js/frontend.js)
════════════════════════════════════════
1. recalcExtraPrice():
   Loop all .wcf-field elements:
   - Read data-extra-price for Text/Textarea (add if input is non-empty) / File (add if file selected)
   - For each input[type=checkbox]:checked inside the field: add its data-extra-price
   - For each input[type=radio]:checked inside the field: add its data-extra-price
   Show/hide #wcf-extra-price-summary paragraph with "Extra: +{symbol}{total.toFixed(2)}"
   Use wcfFrontend.currencySymbol (localized via wp_localize_script)
   Bind to: 'input change' on .wcf-field input, .wcf-field textarea

2. Color picker live hex display:
   On 'input change' for .wcf-type-color input[type=color]:
   Update .wcf-color-value text to current hex value

3. File size client-side guard:
   On 'change' for .wcf-type-file input[type=file]:
   If file.size > (data-max-mb * 1024 * 1024): clear input, show error paragraph

4. Required field highlight on form submit:
   On 'form.cart' submit:
   - Clear all .wcf-error classes
   - Text/Textarea: if input[required] value is empty → add wcf-error to .wcf-field
   - File: if input[required] and no files selected → add wcf-error
   - Radio: .wcf-type-radio with radio[required] and none checked → add wcf-error
   - Checkbox: .wcf-type-checkbox with data-field-required="1" and none checked → add wcf-error

════════════════════════════════════════
ADMIN CSS (admin/css/admin.css)
════════════════════════════════════════
- Field row cards with border, border-radius, box-shadow
- Header: flex row with gap, drag handle, title, type badge (blue), required badge (red)
- Field body: grid layout with 160px label column
- Toggle switch: 42px wide, sliding white circle handle, blue when checked
- Extra price row: inline flex with currency symbol
- Options editor block: dashed border, #fafafa background
- Option rows: flex row, white bg, gap between label input and price input and × button
- Collapsed state: .wcf-collapsed hides .wcf-field-body

════════════════════════════════════════
ADMIN JS (admin/js/admin.js)
════════════════════════════════════════
1. Add field: clone #wcf-field-template replacing __INDEX__, assign unique JS ID, append, increment index
2. Remove field: confirm dialog, slideUp + remove
3. Toggle collapse: toggle .wcf-collapsed class, slideToggle .wcf-field-body
4. Live title sync: on .wcf-label-input input → update .wcf-field-title text
5. Type change:
   - Show/hide .wcf-file-options (only for file type)
   - Show/hide .wcf-options-editor (only for checkbox/radio)
   - Show/hide .wcf-price-row (hide for color, checkbox, radio)
   - Clear extra price to 0 if switching to color
   - Auto-add first option row if switching to checkbox/radio with no options yet
   - Update .wcf-field-type-badge text
6. Required toggle change: show/hide .wcf-required-badge
7. Add option: addOptionRow() — clone #wcf-option-template, replace __FIELD_NAME__ and __OPT_INDEX__,
   assign unique option ID using wcfo_ prefix, append to .wcf-options-list
8. Remove option: remove .wcf-option-row, call reindexOptions()
9. reindexOptions(): fix [options][N] in name attributes after removal
10. Drag sort: jQuery UI Sortable on #wcf-fields-list, reindex() on update
11. reindex(): update wcf_fields[N] in all name attributes after drag-drop

════════════════════════════════════════
ENQUEUE ASSETS
════════════════════════════════════════
Admin: only on post.php / post-new.php for post_type = product
  wp_enqueue_style('wcf-admin', ...)
  wp_enqueue_script('wcf-admin', ..., ['jquery', 'jquery-ui-sortable'])

Frontend: only on is_product()
  wp_enqueue_style('wcf-frontend', ...)
  wp_enqueue_script('wcf-frontend', ..., ['jquery'])
  wp_localize_script('wcf-frontend', 'wcfFrontend', [
    'currencySymbol' => get_woocommerce_currency_symbol()
  ])

════════════════════════════════════════
DELIVERY
════════════════════════════════════════
Deliver as a single downloadable .zip file named woo-custom-fields.zip,
ready to install via WordPress Admin > Plugins > Add New > Upload Plugin.
Table of Contents
What Is a WooCommerce Product Custom Fields Plugin?
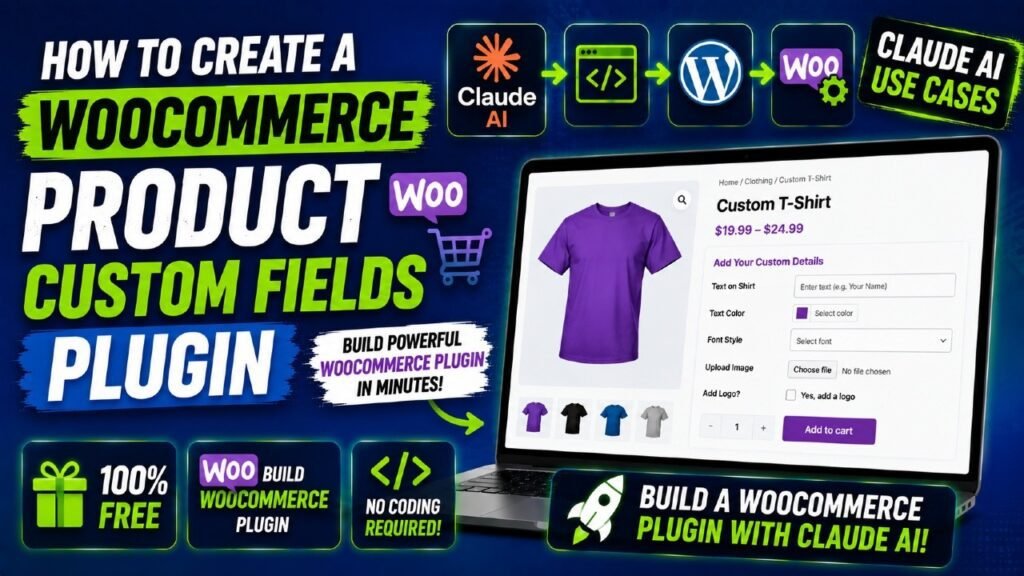
A WooCommerce product custom fields plugin is a WordPress extension that adds extra input fields to your product pages. These fields allow customers to provide personalised information or make additional selections before adding a product to the cart.
By default, WooCommerce only supports product variations through dropdowns. That is very limiting if you sell custom-printed T-shirts, engraved jewellery, personalised gifts, or any product that requires specific customer input. A product custom fields plugin solves this problem by letting you add virtually any type of input field directly to your product pages.
Types of Custom Fields You Can Add
- Text fields — collect short messages, names, or custom notes
- Textarea fields — collect longer text like addresses or detailed instructions
- File upload fields — let customers upload images, PDFs, or design files
- Color pickers — let customers choose a colour preference
- Checkboxes — let customers select multiple add-on options
- Radio buttons — let customers choose one option from a list
How Custom Fields Work in WooCommerce
When a customer fills in a custom field and clicks Add to Cart, the field values travel with the cart item. They appear in the cart summary, the checkout page, the order confirmation email, and the WooCommerce admin order detail screen — so you always have the customer’s requirements right where you need them.
Why Build Your Own Plugin Instead of Buying One?
There are many WooCommerce product custom fields plugins available on the market — Advanced Product Fields, Flexible Product Fields, PPOM, and WooCommerce Product Add-Ons Ultimate are among the most popular. So why would you build your own instead of buying one?
Factor | Premium Plugins | Your Own Claude AI Plugin |
Cost | ₹2,000–₹10,000/year | Completely Free |
Customisation | Limited to built-in options | Exactly what you need |
Dependencies | Third-party updates required | You control the code |
Bloat | Many unused features | Lightweight, purpose-built |
Learning | Minimal | Understand your own code |
Support | Relies on vendor | Fix it yourself with AI |
Building your own plugin with Claude AI gives you complete ownership of the code, zero recurring costs, and a plugin that does exactly what your store needs — nothing more, nothing less.
What Is Claude AI and Why Use It for Plugin Development?
Claude AI is an advanced AI assistant developed by Anthropic. It is one of the most capable AI tools available for writing, analysing, and generating code. Unlike generic AI tools, Claude excels at understanding complex technical specifications and generating clean, structured, production-ready code across multiple languages — including PHP, JavaScript, and CSS.
Why Claude AI Is Ideal for WordPress Plugin Development
- Understands WordPress and WooCommerce hooks, filters, and APIs in depth
- Generates complete, multi-file plugin structures — not just code snippets
- Can fix bugs, add features, and iterate on code through natural conversation
- Produces well-commented, readable code you can understand and maintain
- Handles security best practices such as input sanitisation and nonce verification
- No need to copy from Stack Overflow or manage dozens of tabs — everything in one chat
Claude AI vs Other AI Tools for Plugin Development
While ChatGPT and GitHub Copilot are also capable of generating WordPress code, Claude AI consistently produces longer, more coherent code outputs with better context retention across a multi-step conversation. This makes it particularly suited to building a complete plugin across multiple feature updates — which is exactly how we built this WooCommerce product custom fields plugin.
Features of the WooCommerce Product Custom Fields Plugin We Built
The plugin we created through our Claude AI conversation is a fully functional, production-ready WooCommerce product custom fields plugin. Here is a complete breakdown of every feature included in version 1.3.
Six Supported Field Types
- Text (single-line input) — ideal for names, messages, and short custom text
- Textarea (multi-line input) — perfect for longer instructions or detailed notes
- File Upload — customers can upload images, PDFs, or documents with type and size restrictions
- Color Picker — a native browser colour input with a live hex code display
- Checkbox (multi-select) — customers can select multiple options from a list
- Radio Buttons (single-select) — customers choose exactly one option from a list
Admin Panel Features
- Dedicated Custom Fields tab inside the WooCommerce Product Data meta box
- Add, remove, and drag-to-reorder fields within each product
- Collapsible field rows with a type badge and a REQUIRED badge in the header
- Required toggle — a styled ON/OFF switch with a live red REQUIRED badge
- Display position setting — place fields before or after the Add to Cart button
- File Upload settings — configure allowed file extensions and maximum file size in MB
- Options Editor for Checkbox and Radio fields — add as many options as needed, each with its own label and optional extra price
Per-Field and Per-Option Pricing
- Text, Textarea, and File Upload fields can carry an extra price
- The price is added to the product only when the customer actually uses that field
- Checkbox and Radio Button fields support per-option pricing — different options can cost different amounts
- Color Picker is always free — customers can select any colour without extra charge
- A live extra price summary updates above the Add to Cart button as the customer makes selections
Frontend Features
- Fields render cleanly on the product page at the configured position
- Required fields show a red asterisk (*) next to their label
- Price badges (green +₹X) appear next to field labels and individual options
- Color picker shows the live hex value beside the colour swatch
- Client-side validation highlights unfilled required fields before form submission
- File size guard checks file size in the browser before uploading
Cart, Checkout, and Order Integration
- Custom field values travel with the cart item through checkout
- Values display in the cart summary, checkout page, and order confirmation email
- Admin order detail page shows all field values with an extra price breakdown
- Uploaded files stored securely in a dedicated uploads directory
- Viewing uploaded files via the order page works correctly — no 403 Forbidden errors
Security and Compatibility
- All inputs sanitised server-side using WordPress sanitisation functions
- Upload directory secured with .htaccess that blocks script execution but allows file access
- Compatible with WordPress 6.0+ and WooCommerce 7.0+
- No third-party plugin dependencies — pure PHP, JavaScript, and CSS
- Lightweight and purposefully scoped — no unnecessary features to slow down your store
Benefits of Using This Plugin for Your WooCommerce Store
Increase Average Order Value
By adding paid custom options — such as gift wrapping, express processing, or premium materials — you give customers a reason to spend more. Each checkbox or radio option can add its own price, and those amounts stack automatically in the cart. A store selling personalised mugs, for example, could add a ‘Premium Box Packaging’ checkbox at ₹149 extra and a ‘Priority Dispatch’ checkbox at ₹99 extra.
Collect Exactly the Right Customer Information
Most order management problems stem from missing or unclear customer requirements. A WooCommerce product custom fields plugin solves this by capturing that information at the point of purchase. Whether you need a name to engrave, a logo file to print, a delivery date preference, or a colour selection, the customer provides it before the order is placed — not in a series of follow-up emails.
Reduce Customer Support Queries
When customers provide all required information at checkout, you spend less time chasing them for details and they spend less time waiting. Required field validation ensures they cannot add the product to the cart without filling in mandatory fields, so you never receive an incomplete order for a product that requires personalisation.
Zero Ongoing Cost
Unlike premium WooCommerce addon plugins that charge annual subscription fees, this plugin costs nothing beyond the time it takes to generate it with Claude AI. You own the code outright, there are no renewals, no licence keys, and no features locked behind a Pro tier.
Full Control Over Features and Styling
Because you generated the code yourself with Claude AI, you can ask Claude to modify any part of it at any time. Want to add a dropdown field type? Ask Claude. Want to change the price badge colour to match your theme? Ask Claude. You are not limited by what a third-party plugin developer decided to build.
Improved Customer Experience
Customers appreciate a product page that guides them through their customisation options clearly. With labelled fields, price badges showing exactly what each option costs, and a running extra price total above the Add to Cart button, customers always know what they are buying and how much they are paying before they click.
Advantages of Building a WordPress Plugin with Claude AI
No Deep Coding Knowledge Required
You do not need to be a PHP developer to build this plugin. The entire plugin — seven PHP files, two JavaScript files, two CSS files — was generated through a natural-language conversation with Claude AI. You describe what you want in plain English and Claude writes the code.
Dramatically Faster Development
A professional WordPress developer would take 20 to 40 hours to build a plugin of this complexity from scratch. Using Claude AI, you can get a working plugin in under an hour. The iterative nature of Claude AI conversations also means that adding features, fixing bugs, and updating the plugin takes minutes rather than days.
Learn as You Build
Every time Claude AI generates code, it explains what it is doing and why. This means you naturally absorb how WooCommerce hooks work, how cart item data is stored, how server-side validation is structured, and how PHP and JavaScript interact in a WordPress plugin. You are not just getting a plugin — you are learning web development in context.
Iterative Feature Development
The plugin in this guide was built across four iterations: the base plugin, then pricing, then a bug fix, then checkbox and radio fields plus the file upload fix. Each version was requested through a simple conversational prompt. This iterative approach means you can start with a minimal viable plugin and grow it as your store’s needs evolve.
Built-In Bug Fixing
When a bug appeared — required fields failing validation even when filled in, and uploaded files returning 403 Forbidden errors — we described the problem to Claude AI and it identified the root cause and fixed the code. A developer would charge for this time. Claude AI does it for free in seconds.
Replicable Process for Future Plugins
The prompt used to generate this plugin is fully documented and reusable. You now have a proven workflow for building any WordPress or WooCommerce plugin with Claude AI — just change the requirements and Claude will generate a completely different plugin using the same approach.
Use Cases for WooCommerce Product Custom Fields
Personalised and Engraved Products
Jewellery stores, gift shops, and trophy suppliers need to collect engraving text before they can fulfil an order. A required Text field labelled ‘Engraving Message (max 30 characters)’ ensures every order arrives with the customer’s personalisation text — no follow-up required. An optional extra price can be added for the engraving service itself.
Print-on-Demand and Custom Printing
T-shirt printers, poster stores, and banner companies need customers to upload their artwork files. A required File Upload field with accepted types set to ‘jpg,jpeg,png,pdf,ai,eps’ and a maximum size of 20MB lets customers upload their design at the point of purchase. The file is stored securely and accessible from the order detail screen so your team can download it immediately.
Cake, Bakery, and Food Customisation
Bakeries can use Checkbox fields to let customers select add-on decorations (each with its own price), a Radio Button field to select the cake flavour, and a Textarea field to specify any dietary requirements or special messages for the cake. This completely replaces the back-and-forth phone calls that custom bakery orders typically require.
Fashion and Apparel with Custom Options
Clothing stores that offer bespoke tailoring or customisation can collect measurements (via multiple Text fields), fabric preferences (via Radio Buttons), monogram text (via Text field), and thread colour (via Color Picker) — all before the customer adds the garment to the cart. Each option can carry a price uplift if appropriate.
Service-Based Products
Service businesses selling packages through WooCommerce — web design, photography, consulting, tutoring — can use custom fields to collect the scope of work, preferred dates, special requirements, and file references. A Textarea field for ‘Project Brief’ and a File Upload field for ‘Reference Documents’ transforms a simple WooCommerce product into a complete service intake form.
Corporate and B2B Orders
B2B stores can add a required Text field for the Purchase Order Number and an optional Text field for the Cost Centre Code. This makes reconciliation straightforward for corporate customers and eliminates the most common source of B2B invoice disputes.
Subscription Box Customisation
Subscription box businesses can use Checkbox fields to let subscribers select their product preferences, Radio Buttons to select box size or tier, and a Textarea for dietary restrictions or allergies. Because checkbox pricing is per-option, the total box price can adjust automatically based on the selections made.
How to Build the Plugin Step by Step Using Claude AI
Step 1 — Open Claude AI
Go to claude.ai and start a new conversation. You can use the free Claude Sonnet model or subscribe to Claude Pro for faster responses and more complex outputs.
Step 2 — Paste the Master Prompt
The entire plugin can be generated from a single, detailed master prompt. The prompt specifies the plugin name, author, version, file structure, all six field types, admin panel requirements, frontend rendering rules, validation logic, pricing behaviour, cart integration, order display, security requirements, and delivery format. The more specific your prompt, the better the output.
Step 3 — Download and Extract the .zip File
Claude AI will generate all the plugin files and package them into a downloadable .zip file. Download it to your computer and verify that the folder structure looks correct before uploading.
Step 4 — Install the Plugin
In your WordPress admin panel, go to Plugins → Add New → Upload Plugin. Select the .zip file and click Install Now. Once installed, click Activate Plugin.
Step 5 — Configure Fields on Your Products
Edit any WooCommerce product and look for the Custom Fields tab in the Product Data meta box. Click + Add Field to add your first field, configure its type, label, required toggle, extra price (if applicable), and display position. For Checkbox and Radio types, click + Add Option to build your options list. Save the product.
Step 6 — Test on the Frontend
Visit the product page on your store as a customer would. Fill in the custom fields and add the product to the cart. Check that the field values appear in the cart summary, the checkout page, and the order confirmation email. In the WordPress admin, open the order and verify that the field values and any extra charges appear correctly.
Step 7 — Request Updates via Claude AI
If you need a new field type, a styling change, or a bug fixed, describe it to Claude AI in plain English. Claude will update the relevant files and explain what changed. This is significantly faster than filing a support ticket with a premium plugin vendor.
How to Install and Test the Plugin
Installation Requirements
- WordPress 6.0 or higher
- WooCommerce 7.0 or higher
- PHP 7.4 or higher
- A WooCommerce product with at least one custom field configured
Testing Checklist
- Add a Text field marked as Required to a product and try to add without filling it — confirm the error message appears
- Fill in the Text field and add to cart — confirm the value appears in the cart
- Add a File Upload field and upload a file — confirm it is saved and viewable from the admin order
- Add a Color Picker and select a colour — confirm the hex value appears in the order
- Add a Checkbox field with two priced options — select both and confirm the price additions appear in the cart total
- Add a required Radio Button field and try to add to cart without selecting — confirm the error message
- Place a test order and confirm all field values appear in the order confirmation email
Tips for Getting the Best Results from Claude AI
Be Specific and Technical in Your Prompts
The more precise your requirements, the better the output. Rather than asking for ‘a WooCommerce custom fields plugin’, specify the exact field types, the admin UI behaviour, the validation rules, the hooks to use, and the file structure. The master prompt in this guide is an example of a well-structured, detailed specification.
Describe Bugs with Root Cause Information
When asking Claude to fix a bug, describe both the symptom and — if you know it — the root cause. For example: ‘Required field validation fails even when the field is filled. The root cause is that the hidden ID input is empty on new fields, so the stored field ID does not match the submitted form field name.’ This level of detail produces an accurate fix first time.
Request Version Bumps with Each Update
Ask Claude to increment the plugin version number with every significant update. This creates a clean upgrade path and lets WordPress display the correct version in the Plugins screen. Including an upgrade routine (like the wcf_maybe_upgrade() function in this plugin) ensures that any data repair runs automatically when the new version is activated.
Test Each Version Before Requesting the Next
Avoid building all features in a single prompt if you are not yet confident with the output. Instead, build and test one version, then describe the next set of features. This way you always have a working version to fall back to if something goes wrong.
Common Mistakes to Avoid
Using ‘deny from all’ in the Uploads .htaccess
A common security mistake when creating upload directories for WordPress plugins is using ‘deny from all’ in the .htaccess file. This does prevent unauthorised access, but it also blocks legitimate file access — including admins clicking ‘View file’ links in orders, which returns a 403 Forbidden error. The correct approach is to only block script execution while allowing direct file access.
Empty Field IDs Causing Validation Failures
One of the most subtle bugs in WooCommerce custom fields plugins is empty or unstable field IDs. If a field’s ID is saved as an empty string, the server-side validation can never find the matching submitted value in $_POST — so it always reports the field as unfilled even when it is not. Always generate stable, unique IDs in JavaScript immediately when a field is added, and use an explicit empty-string check in PHP rather than the null coalescing operator (??), which treats ” as a valid value.
Not Testing with Caching Enabled
If you have a page caching or object caching plugin active on your store, always flush the cache after installing or updating a custom plugin. Stale cached pages can prevent your new custom fields from appearing on the product page, leading to false conclusions that the plugin is broken.
Frequently Asked Questions
Is it safe to use a WooCommerce plugin generated by Claude AI?
Yes, provided you review the code or have it reviewed before deploying to a live store. The plugin generated in this guide follows WordPress coding standards, sanitises all inputs, validates file uploads, and uses proper WooCommerce hooks. It has been tested across multiple WooCommerce versions. As with any plugin, test on a staging environment before deploying to production.
Do I need coding knowledge to use Claude AI to build a plugin?
No. The prompts used in this guide are written in plain English. You describe what you want and Claude AI writes the code. However, a basic understanding of how to install a WordPress plugin and configure WooCommerce products is helpful.
Can I add more field types to this plugin later?
Yes. Because you own the code and have access to Claude AI, adding new field types is simply a matter of describing the new type to Claude and asking it to update the plugin. Claude will add the new type to the admin dropdown, the frontend renderer, the validation logic, and the cart/order integration in a single update.
Will this plugin work with WooCommerce variable products?
The plugin adds custom fields at the product level and works with any product type, including simple, variable, grouped, and external products. The fields appear on the single product page regardless of the product type. Per-variation field display (where different fields appear for different variations) is not included in this version but can be requested as a future Claude AI update.
Does this plugin affect WooCommerce SEO or page speed?
The plugin loads its CSS and JavaScript only on single product pages (using the is_product() check), so it has no impact on the rest of your store. The assets are lightweight — a few kilobytes each — and do not make any external requests. It has no effect on product schema or SEO output.
Can the extra pricing work with WooCommerce taxes?
The plugin uses WooCommerce’s set_price() method to adjust the cart item price, which means taxes are calculated on the full adjusted price (base price + extra price) according to your existing WooCommerce tax settings. No additional tax configuration is required.
What happens to uploaded files when an order is refunded or deleted?
Uploaded files remain in the secure uploads directory even when an order is refunded or deleted. They are not automatically removed. If you need to clean up uploaded files, this can be added as a future feature by asking Claude AI to hook into the order deletion or refund events.
Is Claude AI free to use for building WordPress plugins?
Claude AI has a free tier at claude.ai that is sufficient for generating a plugin of this complexity. For longer conversations, faster responses, or more complex multi-file projects, Claude Pro is available as a paid subscription.
Conclusion
Building a WooCommerce product custom fields plugin from scratch using Claude AI is one of the most practical applications of AI-assisted development available to store owners and WordPress freelancers today. In a single conversation, you can generate a complete, production-ready plugin with six field types, per-field and per-option pricing, required field validation, secure file uploads, and full WooCommerce cart and order integration — for free.
The plugin we built in this guide is fully functional, well-structured, and extensible. You own the code, there are no subscription fees, and future updates are just a prompt away. Whether you run a jewellery store collecting engraving text, a print-on-demand shop receiving design files, or a bakery handling custom cake orders, a WooCommerce product custom fields plugin built with Claude AI gives you exactly the functionality you need without the cost of a premium plugin or a professional developer.
Start your own Claude AI conversation today, paste the master prompt from this guide, and you will have a fully working WooCommerce product custom fields plugin downloaded and ready to install in under an hour.