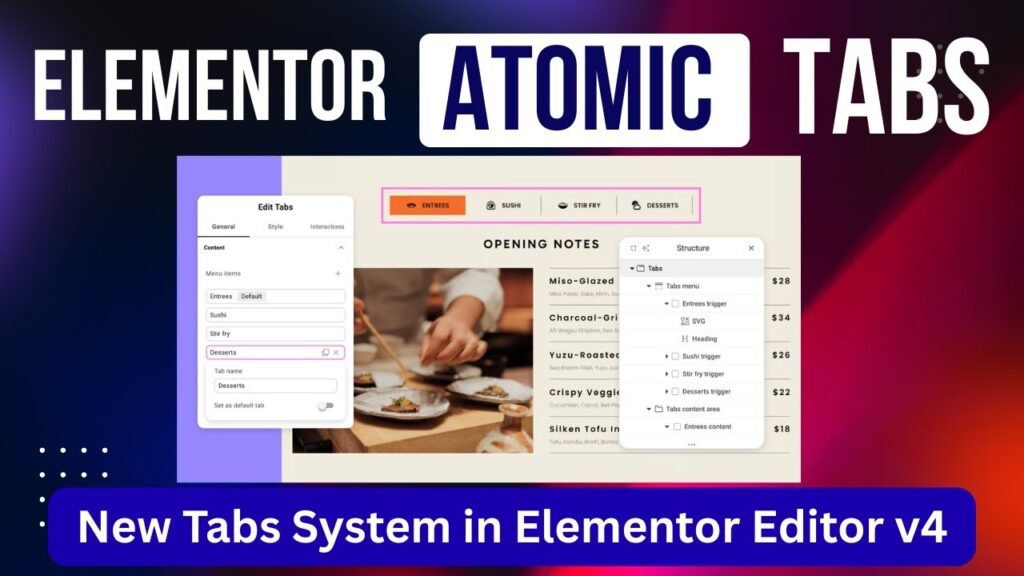
Elementor continues to push the boundaries of web design with its latest iterations. With the introduction of Editor V4 and Atomic Elements, the way we build WordPress websites is undergoing a massive shift. One of the most significant additions to this new ecosystem is the Elementor Atomic Tabs widget.
In this guide, we will dive deep into what Atomic Tabs are, why they are a game-changer for your workflow, and a step-by-step tutorial on how to implement them on your website.
Watch Video Tutorial: https://youtu.be/uRduXBePWKY
1. What are Elementor Atomic Tabs?
Elementor Atomic Tabs are a revolutionary way of handling tabbed content. Unlike the legacy “Tabs” widget, which had a rigid structure and limited content areas, Atomic Tabs utilize a nested structure built on the principles of Atomic Design.
Each part of the tab—from the trigger button (menu) to the content area—is an independent “atomic” element. This means you are no longer restricted to just text or a single image inside a tab. Instead, you can drop any Elementor widget (videos, forms, maps, or even other nested containers) into each tab’s content area.
2. How Elementor Atomic Tabs Work
The fundamental shift in Atomic Tabs is the move away from monolithic widgets toward a modular architecture.
When you drag the Atomic Tabs widget onto your canvas, Elementor creates a hierarchical structure in your Navigator:
Atomic Tabs (Parent Container): The main wrapper for the widget.
Tabs Menu: This contains the triggers (Tab 1, Tab 2, etc.) that users click on.
Tabs Content Area: This is a dynamic container that switches visibility based on the active tab.
Inside the Content Area, each tab acts as a full-fledged Flexbox or Grid container. This allows for infinite design possibilities, as you can build complex layouts within each tab just as you would on a standard page.
3. Key Features of Elementor Atomic Tabs
The “Atomic” approach brings several features that were previously only possible through complex CSS or third-party add-ons:
Nested Elements Support: Drop any widget—YouTube videos, Google Maps, Image Galleries—directly into a tab.
Fully Customizable Triggers: Each tab menu item can have its own icon, typography, and unique styling.
Advanced Layout Options: Choose between Inline, Flex, or Block layouts for your tab menu.
Independent Style Controls: Style the “Active,” “Hover,” and “Normal” states of individual tabs with granular precision.
Performance Optimization: Built on the lean Editor V4 architecture, these tabs are designed for faster loading and cleaner code output.
4. The Benefits of Switching to Atomic Tabs
Unmatched Design Flexibility
Standard tabs often feel “boxed in.” Atomic Tabs break these walls by allowing you to use Containers within tabs. You can create two-column layouts, add background overlays to specific tabs, or even nest tabs within tabs.
Improved User Experience (UX)
Because you can include elements like Call-to-Action buttons or Contact Forms within a tab, you reduce the number of clicks a user needs to take to convert.
SEO Friendly
Atomic Tabs use a cleaner DOM structure, which search engines find easier to crawl. By organizing content into logical tabs, you improve the readability and dwell time on your pages.
5. Step-by-Step Tutorial: Building Atomic Tabs
Step 1: Enabling Editor V4
Before you can use Atomic Tabs, you must activate the new environment.
Navigate to Elementor > Settings in your WordPress dashboard.
Click on the Editor V4 tab.
Ensure that Editor V4 is set to Active [01:29]. Note: As of this tutorial, this feature may be in the Alpha phase, so use it on staging sites first.
Step 2: Adding the Atomic Tabs Widget
Open your page with Elementor.
In the widget panel, look for the Atomic Elements section.
Drag and drop the Atomic Tabs widget onto your page [02:12].
Step 3: Customizing the Tabs Menu (Triggers)
Open the Structure/Navigator panel to see the hierarchy [02:46].
Expand the Tabs Menu to see individual tab triggers.
Click on a trigger (e.g., Tab 1) to rename it (e.g., “WordPress,” “E-commerce,” “SEO”) [03:12].
Add Icons: Click the
+sign within a tab trigger to add an Icon widget. You can then position the icon above or beside the text [05:01].
Step 4: Designing the Content Area
Navigate to the Tabs Content Area in the Navigator.
Select a specific tab content container (e.g., Tab 1 Content) [07:03].
Add Layouts: Drag a Container into the content area. You can set this container to a two-column layout [07:16].
Add Widgets: Drop an Image in the left column and a Heading/Text in the right column [07:23].
Repeat this for other tabs, adding diverse content like YouTube Videos [08:33] or Google Maps [09:30] to demonstrate the power of nested elements.
Step 5: Setting the Default Tab
If you want a specific tab to be open when the page loads:
Select the main Atomic Tabs widget.
In the settings, find the option to set the Default Tab.
Choose which tab (e.g., SEO) should be active by default [11:07].
6. Styling Your Atomic Tabs
The styling options for Atomic Tabs are incredibly deep:
Backgrounds: You can apply unique background colors or gradients to the entire tab section or individual tab triggers [06:28].
Typography: Each text element within the tab menu can be styled independently, allowing for different font sizes and weights for the active tab [06:00].
Layout Spacing: In the Tabs Menu > Style settings, you can adjust the spacing between tabs and choose alignment options like “Space Between” or “Space Evenly” [10:12].
7. Frequently Asked Questions (FAQs)
Q1: Can I use Elementor Atomic Tabs on a live website?
A: Since Atomic Tabs are part of Editor V4, which is currently in an Alpha/Experimental phase, it is recommended to use them on staging sites or for testing purposes until a stable release is announced.
Q2: How do I add more tabs to the widget?
A: Simply click the plus (+) sign in the main Atomic Tabs settings or within the Navigator to add a new tab trigger and its corresponding content area [03:35].
Q3: Is it possible to change the direction of the tab menu from horizontal to vertical?
A: Yes. Under the Tabs Menu > Style > Layout settings, you can change the direction of the flex container to “Column” to create a vertical tab layout [10:23].
Q4: Can I save a specific tab’s content as a template?
A: Because the content area uses standard Elementor Containers, you can right-click the container inside a tab and select “Save as Template” to reuse that layout elsewhere.
Q5: Do Atomic Tabs affect page speed?
A: Atomic Tabs are designed to be more “lean” than legacy widgets. However, because they allow you to nest heavy widgets like Maps and Videos, you should still practice good optimization (like lazy loading) to maintain high performance.
Conclusion
The Elementor Atomic Tabs widget is a massive leap forward for WordPress designers. By treating every part of a tab as an independent, customizable block, Elementor has removed the design shackles of the past. Whether you are building complex product comparison tables or interactive service sections, Atomic Tabs provide the flexibility and power needed for modern web design.
Watch the full video tutorial here: https://youtu.be/uRduXBePWKY